Showing posts with label upcycling. Show all posts

Tuesday, 7 December 2010

2 + 2 = cute

This darling little blouse used to be a bed sheet. Can you believe it? You may remember, I picked up the fabric ages ago at Value Village and it has been sitting patiently waiting to be made into something adorable ever since.


The pattern is the 2 + 2 blouse by Oliver + S. It's the first one I've done by them, and I love it. Nice and easy to follow and beautifully drawn. I'm bummed that I didn't buy the larger size though, this really won't last Abner very long.


My plan is to make this one of Abner's handmade Christmas gifts for this year. I hope she gets a few wears out of it, before we pass it on to someone else...hey, Allie, think this would look cute on Lexi?

Saturday, 20 November 2010

New baby = good reason to party

Last week, these two ladies made an appearance at our office, so we decided to throw a party!


We played games....


There were decorations...a little pink camouflage number I whipped up just for the party.


There were gifts...


...including this one of a kind change pad honouring one of our old recruitment campaigns. The campaign was called What Would You Change, so that makes this a What Would You Change mat! I'm sorry, but it still makes me laugh every time I say it. It's made out of one of the leftover campaign t-shirts, so it counts as an upcycled project to boot!


I also got our entire department to contribute their old work t-shirts to another one of a kind project, a BCIT quilt...'cause what new mom doesn't want a constant reminder of work while they're on maternity leave? It may not be a shining example of my quilting skills, but it gave everyone a good laugh and will be put to good use, I'm sure!


It was so awesome to see Erika and have a chance to hang out with her adorable little girl, Sydney. People need to bring babies to the office more often. Wouldn't that be nice?

Saturday, 30 October 2010

From us to you: Another pillowcase dress

Ages ago - back when I used to actually do some sewing - I wisely pre-made a number of items to give away as birthday gifts. It's nice to know that at one time, in the not-so-distant past, I was smart enough to think ahead like that.

Anyhow, one such item is this adorable little pillowcase dress. I didn't follow any instructions like I did on my previous pillowcase dresses and I think I actually like the result a bit better.


All I did was chop off the closed end of the pillowcase, cut some armholes with my rotary cutter, hem the armholes, fold over and sew down the cut top edge to make a channel for the drawcord, and feed in the bias tape I used as a drawcord. Okay...it sounds like more work than it was. Probably a 30-minute job at the most.


This little dress was given away just last weekend to an adorable little three-year-old. I hope she gets many years of use out of it - first as a dress and later as a top - that is the beauty of a pillowcase dress!

Friday, 8 October 2010

Last minute sewing gift

Someone I've worked with a fair bit over the past few months up and got herself a new job recently. Boo. I desperately wanted to make her a little something as a going away gift, but time has been a wee bit crunched lately (hence my absence from the blog for over a week and a half). In the end, I whipped up some picnic placemats using a set of three linen tea towels I received a while ago from my aunt.


To assemble, I cut two small rectangles off one of the tea towels, folded and ironed down each edge (using one of the already finished edges for the top of the pocket) to form the cutlery/napkin pocket.

The placemat itself is just one of the tea towels folded in half. But before sewing its edges together, I positioned the pocket  in the bottom left corner by sewing down on three sides as well as three seams down the middle to make spaces for three pieces of cutlery and a napkin.

I used strips of fabric from the third tea towel to make the ties as well. The unfinished edges were each ironed toward the middle of the strip and the entire thing was then folded in half and stitched using a zig zag stitch. I then secured it to the right side of the fabric along the edge of the placemat. Then the tea towel was folded in half - right sides together - and stitched along three of the edges with a small opening left to turn the piece out.

To finish it off, I used a point turner to get nice crisp corners and topstitched a 1/4 inch seam around all four sides.


I still had a fair bit of the third placemat left so I cut two squares and made them into napkins by stitching 1/2 inch from each unfinished edge and fraying the edges.


The finished set took all of an hour to do and didn't require any new purchases. In fact, it probably would have taken me a heck of a lot longer and more money to go to the mall and pick out a gift.

As busy as I've been lately, it was a very nice feeling to take a step back, sit down at my sewing machine and create something for a person who will be sorely missed.

Friday, 13 August 2010

This grey dress

OK...it's not much to look at, but I am quite excited about this dress, so please bear with me.


Why am I so excited about a rather shapeless, overly long, plain grey dress? Well, you see, this dress used to be one of my very own t-shirts and now it fits Abner perfectly!

Do you see why I'm so excited yet? No? Let me spell it out for you...I'm excited because I didn't use any pattern whatsoever (side note: I love words that are actually multiple words smushed together). Get it now?!


I cut down the neck, shoulders and fit new sleeves all on my own. I didn't even measure for Pete's sake! I just ran my rotary cutter over the t-shirt and said, "that looks about right", sewed it up, and voila...perfect fit! Sleeves, people! I made perfect sleeves without a pattern!!!


OK, I think I can calm down now. At the moment the sash is just a scrap of fabric I had left over from the anniversary quilt. But, I hope to make a slightly more colourful version soon.

Friday, 23 July 2010

Treasure in the bag (and a winner!)

Let's get the fun part out of the way first. Not to imply that the rest of the post isn't fun. Please don't let that comment dissuade you from reading through to the end...;-). Anyhow, as I was about to say, I used a random number generator to choose the winner and the lucky lady is: comment 5, otherwise known as Cynthia!


Congratulations Cynthia!

Now, onto the rest of this special, bag-related edition of Milkybeer....

I don't know how I managed to overlook it, but I neglected to write a post about my project from last month's (or was it May's?) crafternoon! I alluded to it in two separate posts, and even had all the images uploaded, resized and ready to go, but somehow, I never actually wrote the post!

Without further ado, I give you my crafternoon project: a treasure bag for Abner (and one for cousin Maryn too)!


The inspiration is the Treasure Bag project in Amanda Blake Soule's Handmade Home. It was stunningly easy to do and couldn't look any cuter in my opinion.


The main body of the bag is salvaged window screen and the other materials are scraps I had kicking around from other projects.


Abner is still relatively obsessed with collecting things whenever we go out, so this bag tends to see a lot of action. At the moment there are rocks, shells, dead flowers, a crab shell, feather and several sticks in it.


I can't tell you how handy it is to be able to just shake it around a bit and get all the dirt off before it comes in the house!

Monday, 19 July 2010

My second giveaway

So I realized the other day that it's been over a year since I did a giveaway here on the ol' blog. When I did my first giveaway it took ages to actually get around to making the promised items for each winner. This time, I'm another year older, and another year wiser so I've prepared the giveaway item in advance!

I'd love to find a good home for this cute little summer bag!


The dots are chocolate brown, in case you were wondering.

If you'd like me to send it to your home, please leave a comment below and tell me what you think the bag fabric was originally. [Those of you on Facebook will have an advantage since I posted an update about it a few weeks ago.] I'll draw the winner from among the responses in a few days or so...basically, if you haven't seen a post about the winner go up, there's still a chance to enter. Make sense? Don't worry, you don't have to get the right answer to win!

Good luck!

Thursday, 24 June 2010

No-sew summer cardigan for Abner

Kids can be tricky to dress. They like to run around and get all hot and sweaty so layers they can peel off are a good solution to prevent overheating.

With that in mind, I set out to find a light little cardigan for Abner to wear in the early mornings and evenings when she's outside and it's on the cooler side. After an exhaustive search (by which I mean a quick stroll through the kids section at Joe Fresh), I came up short. There was nothing quite like what I wanted.

Remembering a tutorial I read on Angry Chicken last year (side note: my memory astounds me with its selectivity sometimes...this I remember, but I can't tell you what I ate for lunch yesterday) I grabbed one of the only long-sleeve tops on the rack and went home to make my own cardigan. I should point out that I grabbed the size larger than Abner usually wears so that it could easily layer over other clothes.

start with a long-sleeve top
fold in half and cut up the fold
(just the shirt front, don't cut through the back as well!)
et voila!

It's impossibly cute on Abner and she keeps asking for her cardy whenever we go out so I think she likes it.

If you need better instructions to make your own, you might want to check out Angry Chicken's original post.

Sunday, 21 March 2010

Made lately.

I've been busy lately. It seems that moving my sewing machine into my bedroom has done great things for my productivity.
Just last weekend, I whipped up my first-ever pillowcase dress. It's a wee bit large for Abner just yet, so it'll have to patiently wait to be worn or I will have to give it away as a gift to an appropriately sized little girl. It was shockingly easy to do. Less than an hour and wham, bam, thank you ma'am, it was done. That's my kind of sewing pattern! Thanks Amanda!

The pillowcase was a vintage item picked up at a thrift shop in White Rock. That one shop yielded five pillowcases that day! Not a bad haul for only $2.50!

I also created this cute little apron (or smock depending on who you ask) the same day.
It's from Carefree Clothes for Little Girls and I could not be more in love with it if I tried. The pattern was so insanely simple. In less than an hour, I had this adorable little smock all ready to go. The button is vintage from a collection my mother let me raid a few months back. The fabric is a heavy weigh cotton I've had kicking around my stash since last year's Buy the Yard event.

The pattern called for hemmed edges all around, but knowing how soft this fabric frays, I opted to just zig zag most of the seams. I'm so glad I did, because now that it's washed, it's a really nice touch.

The pattern is supposed to be a size 4, but as you can see, it fits Abner just fine at only a 2T. I expect it will fit her for about the next two years!

Thursday, 24 December 2009

I used to be a t-shirt, now I'm a...

pair of PANTS!

Check it out...I learned how to make ratty old t-shirts into these super-easy, fully functional pants for Abner.

Here's a quick tutorial so you can make your own. Seriously...these are easy. You can do it!

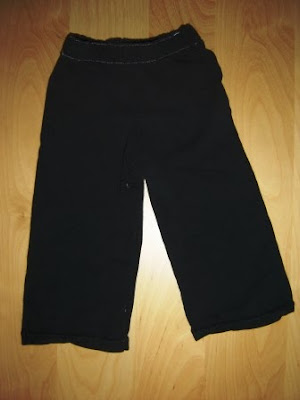
Step one: Pick out a pair of pants that fit your child well and fold them in half as shown below.
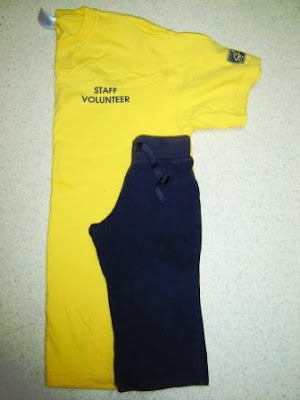
Step two: Select an appropriately hideous t-shirt and fold it in half as shown below.
Step three: Place the pants on the outside edge of the t-shirt as shown below. Be sure the bottom hem of the pants line up with the bottom hem of the t-shirt.

Step four: Using the pants as a guide, cut out the pieces of the new pants.

IMPORTANT: Don't forget to leave a suitable buffer for a seam allowance as well as about 2 inches at the top for an elastic waistband.

You should now have two separate pant legs (as shown below).

Step five: Lay the pieces, right sides together, as shown below.
Step six: Sew up the two crotch seams (indicated with pins in the image below).

Step seven: Re-orient your fabric so it looks like an inside out pair of pants and sew up the inseam.

Depending on the size of pants you are trying to make and the size of t-shirt you started with, you may have had to cut into the sleeve to get the necessary length. If that's the case, just sew up the openings (as indicated with the pin below) before sewing in the waistband.


Step eight: Fold the top edge over twice and pin it in place to make a channel for an elastic waistband.
Step nine: Sew the channel in place by stitching along the bottom edge of the fold as well as about one millimeter from the top edge - this will prevent the elastic from twisting. Be sure to leave an opening to thread your elastic in.
Step ten: Once you've threaded the elastic in and secured the ends, close up the waistband channel.
Step eleven: Wait a minute...there is no "Step eleven" 'cause you're done! That's it! See...I told you it was easy.

Monday, 20 July 2009

DIY: Up-cycled t-shirt skirt

See this cute little skirt? Believe it or not, it used to be one of my t-shirts. Now, it's a cutie-pitutie little skirt that Abner loves!


I've had a stack of old t-shirts languishing in my craft cupboard for months without any ideas about what to do with them. It always seems such a waste to get rid of t-shirts that are in perfectly good shape, but just don't seem to fit right. I'm proud to say I thought this pattern up all on my own and sat down the other evening to whip one up after work.

Ten whole minutes later, I had this cute little skirt on this cute little girl...

Front view:

Back/side view:

If you wish to make one for your little sweetie, here are the super simple steps...
  1. Figure out how long the skirt needs to be; either measure your child or use an existing skirt as a guide.
  2. Take that measurement and add approximately 1.5 inches for the waistband.
  3. Measuring up from the finished hem of your previously-loved t-shirt, mark your measurement.
  4. Cut the t-shirt at the line you just marked. [I found it helpful to fold the t-shirt vertically a few times before cutting. Knit material is a pain to work with, so making a shorter cut is easier than trying to stay in line for a longer cut.]
  5. Fold the unfinished edge in about .5 inches and then about 1 inch again to make a channel for the elastic waistband, pinning in place as you go.
  6. With the wrong side out, sew the bottom edge of the channel being sure to leave about 1 inch open in order to feed in the elastic later on.
  7. Make a second line of stitching just along the top edge of the waistband channel (i.e. about 1-2 mm from the top of the skirt). For whatever reason, that stitching will ensure the elastic won't fold over down the road.
  8. Measure your child around the waist and add about 1.5 inches to your measurement. Cut your elastic to length and attach a safety pin to one end and feed it through the channel. [I used 1-inch elastic for this skirt.]
  9. Overlap the ends of the elastic and stitch securely together.
  10. Even out the gathering on the waistband and stitch up the opening you left earlier.

That's it! You're done. Pretty easy, eh?

Related Posts Plugin for WordPress, Blogger...